
1.0 Prerequisites
To follow this guide, ensure you are able to develop and test outside, or near a southern facing window (northern facing if south of the equator) with a clear view of the sky.
Windows and PuTTy are used to communicate with the board in this guide.
2.0 Hardware Getting started
2.1 Out of the box

The following items are included in the Quectel BG770A-SN evaluation kit:
- BG770A board
- 2 Micro USB to USB type A cables
- GNSS antenna
- YECN028AA 5G/NTN monopole antenna
- Mounted antenna
- Unsoldered PCB header pins
The two main antennas were not documented by Quectel as being included with the evaluation kit. They document an ANT LTE antenna. There shouldn’t be a functional difference, but keep in mind that the antennas used in this guide may not be the antennas included with your kit.
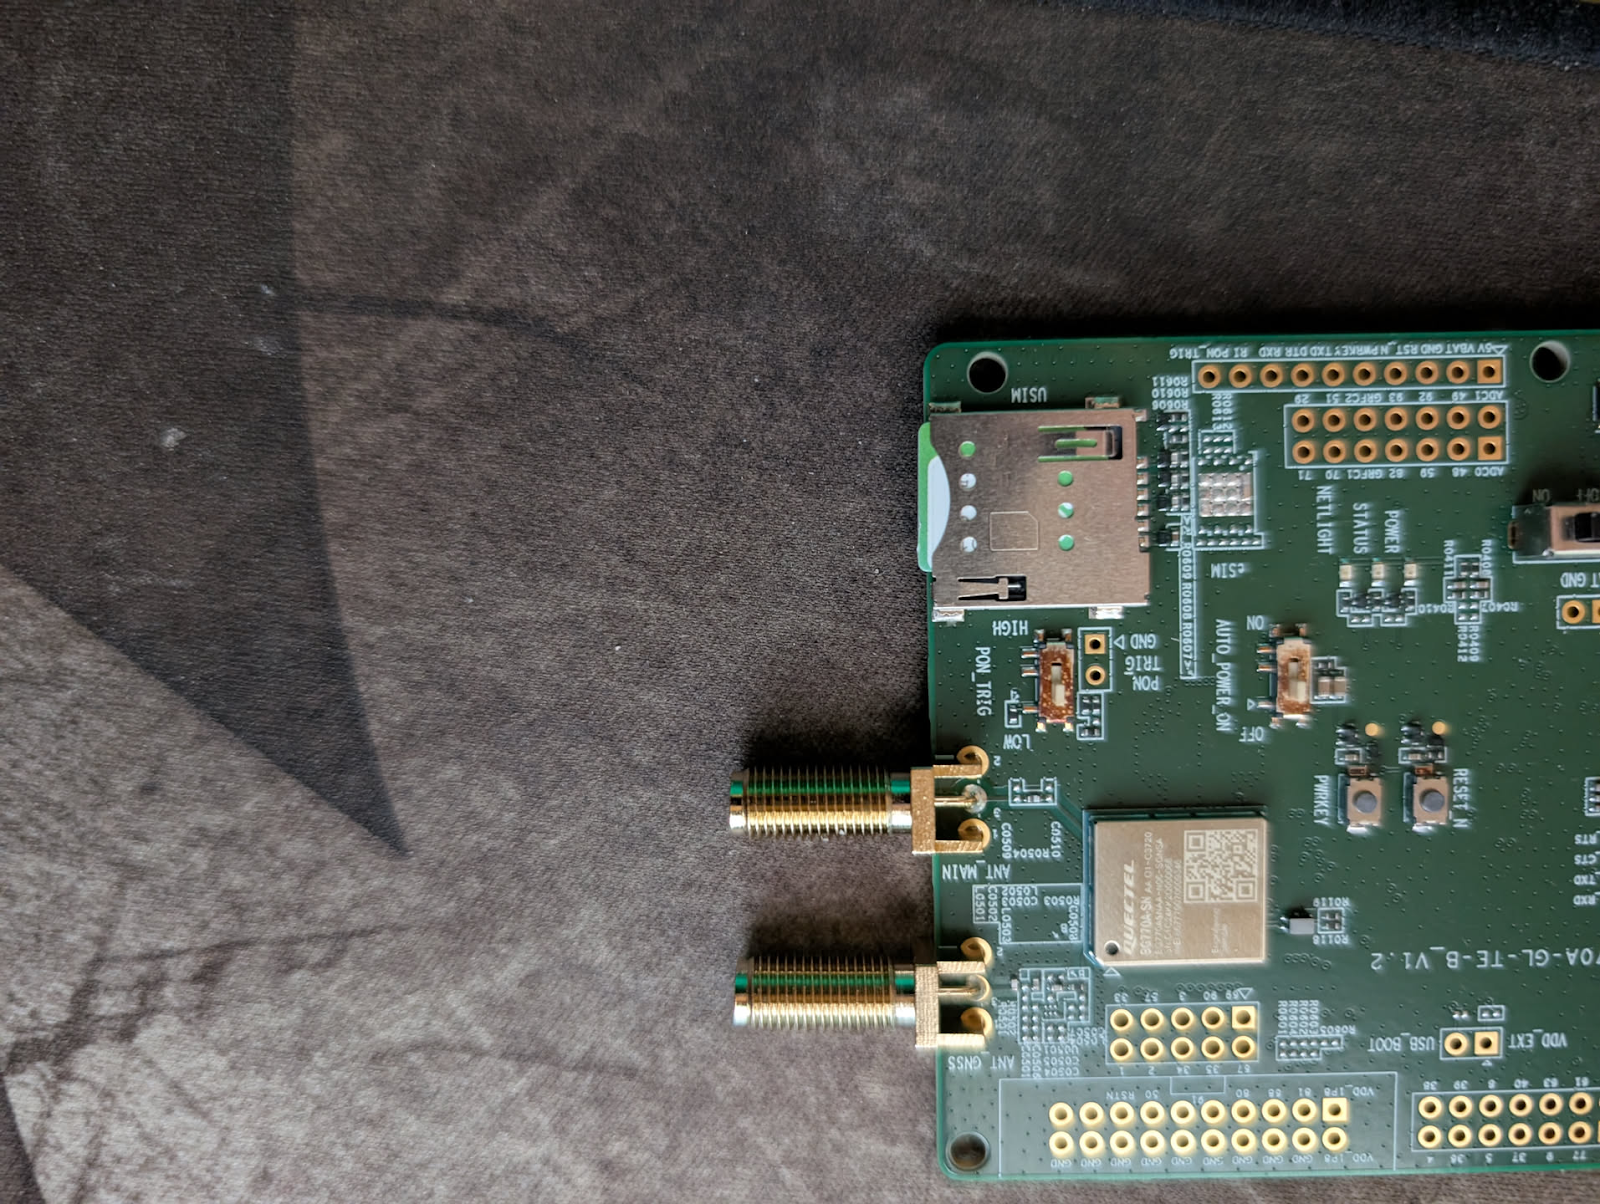
Only a single micro USB is required for development and testing. Plug one of the USB cables into the UART, the bottom USB port

Attach the GNSS antenna to the top, and 5g antenna to the bottom antenna connectors

2.3 SIM Card
The UMTS & ELT EVB accepts a micro SIM card. Ensure that the SIM is subscribed to NTN connectivity.
Insert the SIM card with the metal pads facing down

Push the SIM card in until it clicks into place
2.4 Power the board
Both USB ports are able to supply power to the board
2.5 Power on instructions
After the SIM card is inserted and the antennas are attached, switch S403, PON_TRIG to HIGH (above the SIM card slot)

Then, connect the USB cable plugged into the UART port as described above into your PC
When the board has power, the POWER LED will light Red, and the NETLIGHT LED will flash blue once.

When you are ready to power on the board, press the RESET_N button. The NETLIGHT LED will hold blue for a second

and when the board is online, the STATUS LED will turn orange and stay orange,

and the NETLIGHT LED will blink blue.

3.0 Software Getting Started
3.1 USB Drivers
Download the driver. It is provided within the USB stick. Quectel also links to this page to install the driver: https://www.wch.cn/downloads/USBMSER_exe.html but the page is in chinese and thus the included USB driver is what is discussed below.
Within the drivers folder, run the “CH9344L_Universal_Windows_Driver.exe”


Install the driver.
Once the driver is installed, observe the device manager application in windows:

Make not of the COM port WCH USB-SERIAL Ch A is connected to. Channels B,C,D are used for firmware upgrades, debugging, RF calibration, etc, and are not needed for basic connectivity.
4.0 Communication: PuTTy
This is the easiest way to get connected and the most standard.
Install putty
Once putty in installed, change the connection type to serial, set the baud rate to 115200, and the Serial line to the port listed in task manager:

Change connection type to serial, speed to 115200, and Serial Line to whatever the USB modem or serial cable shows up as in the device manager. Clicking enter will prompt the PuTTY terminal to open. If the terminal opens but you cannot type AT commands into it, then you most likely have the wrong COM port entered. Reverify and try again.This behavior may also be due to the board not being on.
Ensure the connection is live by typing “AT” to check for the OK response.

The board is now on and ready to be configured!
5.0 Connecting to Skylo
The following commands will configure the board to use Skylo’s NTN network.
(Optional) First lets ensure that the SIM card is inserted and being read properly by checking the Circuit Card ID (CCID). This is unique to each SIM card
AT%CCIDYou should get a response similar to:

In the event you get ERROR, try restarting the board until it produces the Circuit Card ID
Restart the board using:
AT+CFUN=1,1First, lets set the board to its factory settings and restart:
AT&F1AT+CGDCONT=1,"IP","YOUR.APN"Set the Access Point Name (APN) for the board. This value is determined based on your SIM provider. Contact your SIM provider if you do not know the APN for your SIM Card.
at+qcfg="band",0x0,0x0,0x0,0x7This command tells the board to automatically select the band, as it enables all bands with 0x0
AT+QCFG="ntn/pos","ignss",1 The board needs to know its location to communicate with the satellites. This command enables the internal GNSS (Global Navigation Satellite System)
AT+CFUN=1,1Reset the board to put the changes into effect
AT+QCFG="iotopmode",3,1Forces the module to use NB-IoT versus Cat m1
AT+QCFG="ntn/ev","ta",1
AT+QCFG="ntn/ev","sib",1
Enable notifications for System information Blocks (SIB) and Timing Advance (TA) updates. These updates. These updates are important as they tell us when required information has been determined to connect to the satellites. Learn more about the importance of these calculations here.
AT+CEREG=2We set the carrier registration to 2. This puts the board in a state where it is actively trying to connect to a network.
AT+CFUN=1Finally, we re enable the radio.
It may take a up to a few minutes for the connection to be established. Once you get a response of CEREG: 1 or CEREG 5, then your device is registered and connected to Skylo!

Troubleshooting
If you are unable to connect, there are a few common issues. Below shows the meaning of the carrier registration codes:
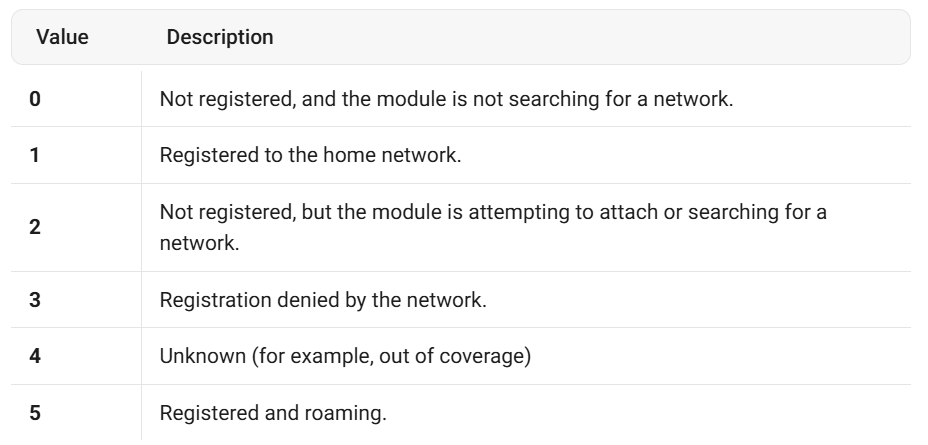
If the board gets stuck on CEREG 0 or 2, it likely cannot find the network. This is most likely due to connectivity issues. Ensure you are outside/have a clear view of the sky. Ensure that you are facing south ( North if south of the equator) and are not obstructed by buildings. Skylo utilizes geostationary satellites that orbit above the equator.
An incorrect APN set would also cause registration to be denied. Ensure that the APN is set correctly to the value provided by your Skylo partner.
You can validate the quality of your signal with the following command:
AT%MEAS="8"
Get information about the connection:
AT+QENG="servingcell"Test the connection
Ping
Try sending out a ping over the network.
AT+QPING=1,"8.8.8.8",3Send out 3 Pings over the satellite connection to Google’s DNS servers.
Send a packet
To test the capability of the BG770A, let’s try sending and receiving a simple UDP packet over Skylo.
Below is a basic Python script that will output the payload of anything it receives in a UDP packet on port 12345.
import socket

UDP_IP = "0.0.0.0"  # Listen on all available interfaces
UDP_PORT = 12345

sock = socket.socket(socket.AF_INET, socket.SOCK_DGRAM)  # UDP

sock.bind((UDP_IP, UDP_PORT))

print(f"Listening for UDP packets on {UDP_IP}:{UDP_PORT}")

while True:
    data, addr = sock.recvfrom(1024)  # buffer size is 1024 bytes
    print(f"Received message from {addr}: {data.decode('utf-8', errors='ignore')}") # decode and print the data. errors='ignore' prevents crashes from non-utf-8 characters.
Ensure that this script is running with access to port 12345 over the open internet. Configure firewalls to port forward if you are behind NAT. You can test this with netcat:
echo "Accessability Test" | nc -u 1.2.3.4 12345Now, to send a packet from the BG770A, use the following commands:
AT%SOCKETCMD="ALLOCATE",1,"UDP","OPEN","1.2.3.4",7,12345Here we allocate a UDP socket to an IPv4 address, replace 1.2.3.4 with the address of your machine.
AT%SOCKETCMD="ACTIVATE",1Activate the socket connection.
AT%SOCKETDATA="SEND",1,13,"48656c6c6f2066726f6d20537061636521"Send a hexadecimal encoded payload over the socket connection
AT%SOCKETCMD="INFO",1Get information about the connection. Gives source and destination IP addresses
AT%SOCKETCMD="DELETE",1Close the socket connection and deallocate it.
Checking back in on the UDP server

6.0 Simple Proof of Concept Use Cases
The following are some simple applications that can be created to utilize NTN functionality:
- Always connected GPS tracking
- Log the GPS location of a device no matter where on the earth it is located. Use Google Maps Javascript framework and a simple backend to show the live location of the device in real time.
- Always connected sensor monitor
- Record readings from a sensor and upload those values from anywhere on the planet. Import this data into a metric monitor like grafana
- Always connected security sensor
- Setup a sensor to detect movement in remote sites or locations.
7.0 Helpful Links
- https://docs.monogoto.io/getting-started/sim-cards/isim/quectel-bg770a-sn
- https://www.quectel.com/product/bg770a-sn-satellite-communication-module/
Author:
Eli Bollinger